Portfolio and branding

10 08 2013

September will make the start of my final year of university so in preparation for this I have been doing a lot of preparation work to try and make the year easier on myself.

One thing I have spent alot of time working on and thinking about is my portfolio and CV. I know this will be an important think so I have given it as much time as I can before September and its starting to take shape now. But whilst compiling my work I felt something was missing and I think I’ve twigged what it is. When ever I do my portfolio or work I don’t really have a logo or anything and I feel this would improve the look of my work. I have started on an idea but I’m not sure how it will come out. This is it so far.

20130810-111002.jpg
My plan is to try and tie my CV and portfolio together via the way they are laid out and designed but also through the colour scheme used. This will also apply to business cards and headed paper to try and give a more professional look and show my creativity.

I will upload more updates and images when I can. I’m still not 100% on how to do my portfolio so any advice would be appreciated. Thank you for reading

Student Render


Photo manipulation

1 07 2013

Today I decided I would go play around in the garden with my camera and after many general photos of the garden I noticed this flower which really stood out to me. I just liked its forms and the way the petals curled at the end but also the way the yellow stamina contrast with the white of the petals. After taking many pictures trying to get the image I was after I finally settled on one to work with and have a play with. so after 10 minutes of messing around here is the first edit of this flower.

DSCF2242

I will play around with the image more soon. Let me know what you think or if you have any suggestions.

Thank You for reading

Student Render.


Summer Skills Endeavour.

4 06 2013

Following on with my recent choice to try and further my photoshop abilities I have been following various tutorials to teach myself different and new skills to enable me to work more efficiently during my third year of university. My aim is to try and get as many possible computer skills under my belt or at least become more familiar with these programs to help in my third years. This has led to me reviewing my current skills and working to improve my weakest areas. I have begun with photoshop, as this is an area I am not very familiar with and that I know I need to do the most work on. So here is today’s work. I have followed a tutorial on how to produce this image and it needs tweaking to make it look a little better but that will follow soon. The tutorial showed me a lot of skills and buttons that I have not previously explored or worked which was the main aim. I will endeavour to develop the newly found functions in the future but for now enjoy the image and if you have any constructive criticism or advice do leave a comment here on the blog. Also if you have any tutorials that you have found useful I would be most grateful to hear about them.

Thank you for reading,

Student Render.

20130604-224150.jpg


Quick Photoshop Editing Exercise

2 06 2013

So I’m currently on holiday in east Cornwall with family, but me being me I can’t help but mess around with designing and editing software. I have been playing around with some photographs I took yesterday at RHS Rosemoor and trying to learn some of the basics of Photoshop’s photo editing tools. So here is a Quick Image I have worked up it took about 15 minutes and is far from finished but what do you think?

Edited Flower 1Thanks for reading,

Student Render


How do you like your coffee?

7 05 2013

How do you like your coffee? It’s a simple question that is normally answered with answer relating to milk and sugar (or cream). It’s a very personal thing and personal preference and past experience guides us. Now there are guides and information available everywhere telling us how to make the perfect cup of coffee but isn’t this impossible. If the perfect cup of coffee is influenced by are own preferences and our own views of what is right and wrong then nothing can ever be perfect for everyone.

The point I’m trying to make is that coffee like many things in life are completely personal. So there is no right answer. My current university project has got me looking at coffee and researching into it. The main thing I’ve noticed is that if you look for instructions to make the best cup of coffee possible there are about 50 different methods, all completely different and covering a wide spectrum of combinations just to make that one “perfect” cup. So how do you draw any correlations or trends in all this.

So I thought I would ask real people how they make their coffee, how they like it. This information will hopefully then be compiled and reviewed. I’m mainly interested in figuring out what sort of coffee people mainly drink ( filter, cafetière , percolated or other) and how they make it , if there are any little secrets or anything they stick to. Any information would be of great help.

This research and information will then be used to help with a serious of designs for a personalised coffee device. I will make sure to put the designs on here for people to see.

Thank you for reading and I look forward to reading about your perfect cup of coffee.

Student Render.


Material Exploration

7 04 2013

As part of my current University project we have had to take an item that is designed in plastic steel or ceramics and re-design the object using a more sustainable material or a lower impact one. We have had to think about these materials and look into their strengths and weaknesses and the energy that is used to produce and manufacture these materials.

I have really struggled with this for a while as I couldn’t pin down what I wanted to look at which is why the blog has been so quiet recently. But I eventually settled on looking at a car dashboard unit being made from materials such as paper pulp and newspaper wood (which I have talked about it another post here). The reason I settled on these paper based materials is because I believe they hold real potential for our future. I know there are floors to these materials but there are flaws with all materials and I believe that by using fast growing trees in a well-managed area it could lead to a successful manufacturing chain but not a perfect one.

I remember I was watching Top Gear UK recently and they were talking about the Peugeot Onyx concept car that used newspaper wood for the dash-board and this to me was a brilliant idea and I wanted to see if I could take it further and progress it as Peugeot were just using it for the skin of the dashboard. But my thinking is to use it for the substructure as well.

My thought process about the material actually started when I was on a train journey. I kept seeing people with newspapers who would just leave them on the train when they left. This lead me to wondering about what happens to all the newspapers that aren’t sold each day ,what happens to them? After asking some local shops I found out that they were collected at the end of the day and taken back to the newspaper manufacturer for recycling and reusing.

After a lot more research into the newspaper production chain I thought well if I can just add a detour into the life cycle of a newspaper I could reduce the amount of plastic used in a car. I will explain what I mean.

If when a newspaper isn’t sold or when a person throws it away into recycling instead of going to a recycling plant or a paper factory, if instead it went to a car manufacturer or a local company that made the dashboards for a car company then the paper could be transformed into a dashboard unit. Then after the car has lived its life the dash unit could be ripped out and recycled using the normal methods and put back into the paper cycle. Maybe its then  used again for another newspaper. This could in theory mean that the newspaper you read one day is in the new car you buy the next day.

I know this is all just theoretical and there are big holes in the idea but I believe it could work for companies that turn out lower numbers of cars each year such as Morgan or Caterham or even slightly bigger companies like Ferrari or Lamborghini.

I have since been experimenting with paper pulp and newspaper wood to see what is possible and what level of finish can be achieved. I have been impressed by the strength of the material and the simple method used to create it.

I hope you have enjoyed reading this, Let me know what you think or any advice you might have.

Student Render.


Newspaper Wood.

8 03 2013

As part of my current university project I have been looking into a material called newspaper wood. Now the name gives away the fact that this material is made of recycled newspapers. Personally I’ve found this material really interesting to look into and think it has some real potential but has it? As part of my project I have to assess the material I’m looking at from cradle right the way around the final gravel. so this meant finish researching about newspapers.

In the UK an estimated 15,000,000 news papers are sold in the UK everyday. that makes an annual total of 5,500,000,000 Papers just in the UK alone. That is a huge number but is also a declining number from past figures. If we were to gather all these newspapers for a year into a pile it would have a weight of 1,200,000 Metric tons (working on an average paper weight of 220g grams). Now that’s a lot of paper.

After I figured out these figures I decided to look into what happened to unsold papers here in the UK. To do this I went around all the shops in Plymouth that sold newspapers and ask them what they did at the end of the day with their unsold papers and all of them told me they were picked up in a van and taken back to the manufacturer. After gaining this information I looked into the actual production process of newspapers and what happens to the recycled papers.

Now there are a lot of processes that go into making paper and I’m not going to talk about them all but I will mention the parts that were surprising to me or that I didn’t know before. The first of these parts is gathering the raw materials. Now what I didn’t realise was that in the US they only use saw mill waste or trees thinned out of construction tree plantains and they don’t use any old growth ( trees that weren’t grown for paper/construction but that are natural). During this research I learnt that when older newspapers are recycled the de-inking process uses 1/6th less energy then using new material. also the bi-product of the de-inking is a good farmers soil conditioner.

By doing this research its made me think a lot about how Newspaper wood could fit into the system. The Dutch designer who created this material states that they use a biodegradable adhesive which contains no plastic. So in my head this could lead to the material being recycled once its finished with and maybe even taken back to the paper plant and turned into another newspaper. I need to look into this aspect more but to me it seem feasible on a smaller production level.

for further information about this material please go to vij5 website.

So what do you think could newspaper would be a viable alternative to say some plastic products? Let me know what you think.

Thank you for reading.

Student Render.


Project Update

6 03 2013

So my current university project about Materials and Processes is going really well. I have decided what I want to look into and figured out how im going to compile all of the information I find out.

As I have said before the project is split into 2 halves. Part A – Material and process research and part B – Re-design a steel, plastic or ceramic object with a more sustainable material or process.

Part A – After a long chat with my lecturer and a lot of reading around the subject I have decided to make an App. This app will contain all the information and links I have found about the various materials and processes I have to investigate. This app will also have another function (time permitting) which will be to be linked to a samples chest in our design studio. The idea is that there will be a chest with various samples all of which will have QR codes on them. The user scans the QR code on a mobile device loaded with the app. The QR code will then take them to the relevant material and give them information and maybe links to a supplier.

Part B – After seeing the new Peugeot Onyx on top gear the other week I have been looking into newspaper wood. Peugeot used it as a dashboard material instead of plastic and I’m going to look into the feasibility and viability of using this material for a similar purpose. I’m going to look at how viable it is to put this material into a more mass market and if there is actually enough newspaper out there to make it possible. I have been given till Tuesday next week to figure out if this material is feasible and if not I need to rethink and maybe adjust this part of my project.

So what do you think. Do you think a car dashboard made of old newspapers is a good idea?

Thank you for reading

Student Render.


Solidworks Chopper Tutorial Review.

25 02 2013

Since going to university I have learnt a lot of things. One of which is how to use Solidworks. I am mainly self-taught  and I have spent a lot of time looking all over the internet of crumbs of information. In doing this I have completed a lot of tutorials which have sometimes been very hard to understand or they have been far above my ability. But I have never given up looking for knowledge and training.

Since I became aware of Solidworks nearly 3 years ago back at sixth form there has been one tutorial that I’ve always wanted to try LearnSolidWorks.com‘s Chopper tutorial. Whenever I’ve been looking for tutorials to follow I have always found myself looping back to this one. It looked amazing to me and like a really good challenge.

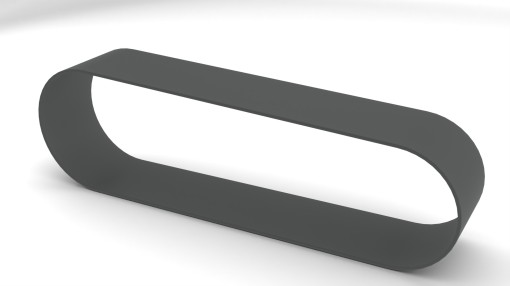
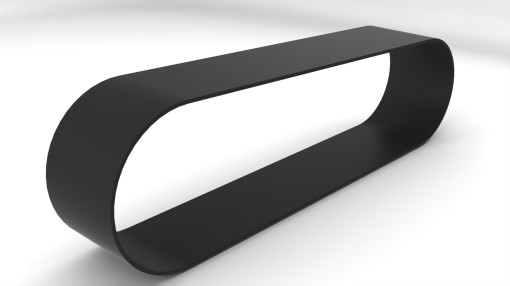
Recently I have had the opportunity to try the first part of this tutorial and it lived up to my expectations. The tutorial was about how to make a transmission belt which I found simple and easy to complete but this tutorial was supposed to be easy and introduce the basic principles that would be built on later on more complex parts of the bike.

As I had completed this part in less than 5 minutes I decided to test just how simple it was by getting a housemate of mine to give it a try. My housemate has never used solidworks or any similar programmes so I thought that she would be a good guinea pig. She completed the tutorial in under 10 minutes with no problems and without having to ask for help. This is due to the simplicity of the way the instructions are set out and the clear images that are used.

I have enjoyed my experience so far following this chopper tutorial from LearnSolidWorks.com and I would recommend it to anyone who uses or is learning Solidworks as a refresher course or as a first project. I would give this tutorial 10/10. I have put some renders of my housemates completed model below.

You can find this tutorial at the address: LearnSolidWorks.com

Thank you for reading and let me know what you think of this tutorial

Student Render.

Transmission Belt 1 Transmission Belt 2


Synthetics Research

24 02 2013

So this weeks research was into synthetics such as plastics. I was given an item and an A3 sheet with lots questions I had to answer about my object. The object that I was given was a plastic clothes peg. I spent a good couple of hours trying to figure out how it was made and identifying all the markings and lines on the clip.

These were all part of understanding the process that is undergone to extract the raw oil to turning it into a useable object and then what happens after we have finished using the object.

I spent the most time trying to figure out what tooling would be used to produce this part. After some research and a lot of sketches I came to the conclusion that it was made via a Twin shot two-part mould. I figured that to achieve the rubbery lighter blue part at the front of the peg it would require a blanking core during the first shot and a new formed core during the second shot. I did try to communicate this through a drawing but it was very complicated and I need to rework it but I will upload an image when I have done this.

So yer that was the first little bit of my project and it led to an hour-long discussion about witness lines and vapour blasting touching on shore hardness. During this discussion many objects around our studio were looked at and studied for their finish and there levels or reflectivity. We also talked about how companies hide witness lines and this lead to looking at cars that were parked outside of the building and how their body panel lines hide all sorts of things and helped define the shape of the car.

I found the lecture fascinating and I learn so much from it the next part of this mini one week project is to document my findings and the techniques and materials I investigated for future reference.

Thank You for reading

Student Render

IMG_0386 IMG_0388